Sunday 31 August 2014

ATC Swap - 4 Seasons

So another ATC Swap has arri bed, this time over at the wonderful and so inspiring That Craft Place Natter & Chatter group on Facebook!

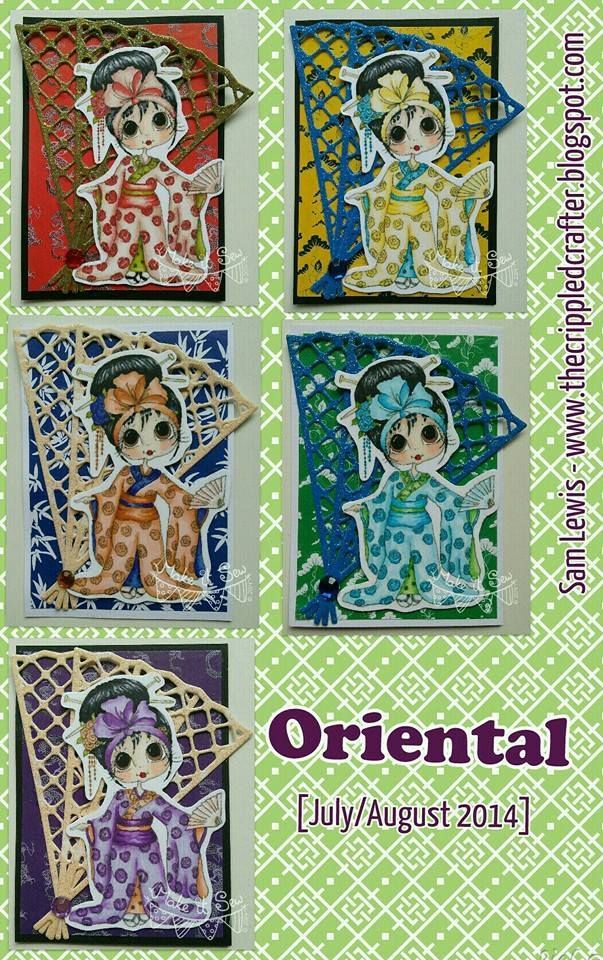
The theme this time was 4 Seasons, with instructions to make 4 ATCs, one for each of the seasons of the year!

I love this group as a lit of mixed media stuff goes on, something I am increasing my knowledge of challenge by challenge!

So I set myself 2 additional rules for this swap; Rule 1 was to use a mixed media / handmade background instead of preprinted papers etc. Rule 2 came in after my ideas started forming and that was to include skeleton leaves into to the design of each ATC and I managed it!!
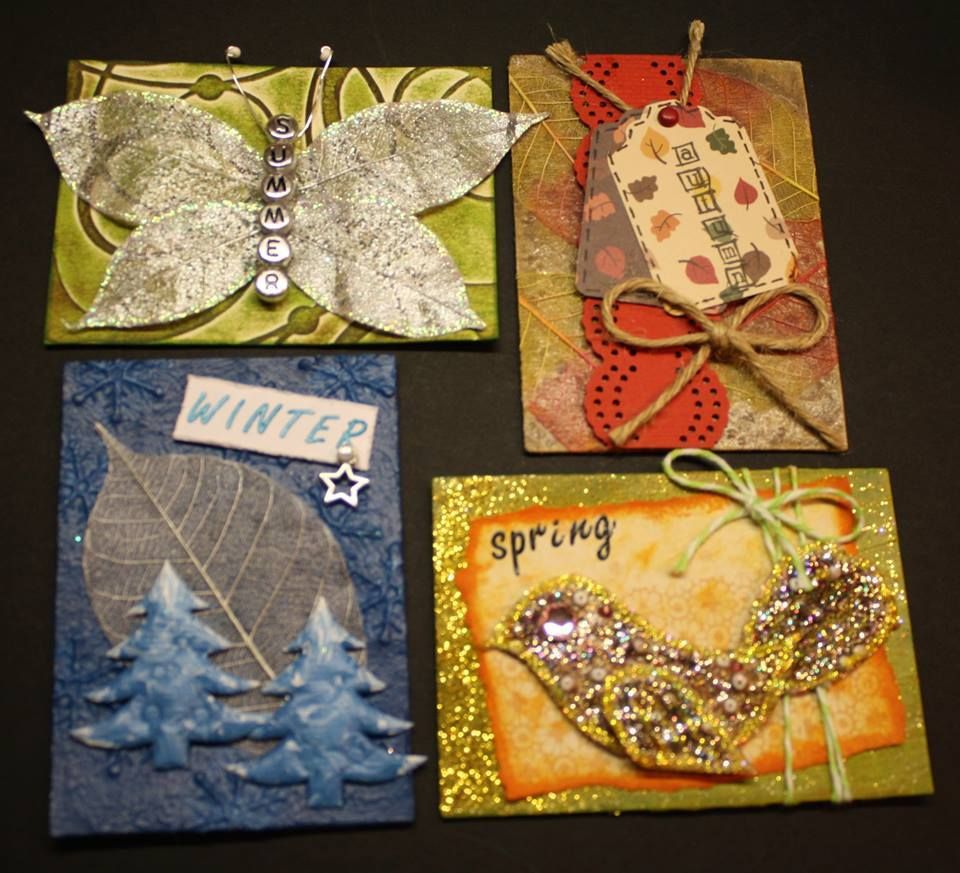
 
 
Spring:
 
This ATC I struggled with the most out of all these four, and I actually binned 2 attempts and completely rethought my design!!

The background is acrylic paint and gold glitter. Then the paper layered over the top is inked with distress ink.

The bird is made from cream skeleton leaves. I triple embossed some leaves with clear embossing powder after spraying heavily with Crafters Companion Iridescent Spray and Sparkle. I then smeared a layer of PVA and sprinkled more glitter and small beads. I left this to dry before doing a final layer of clear embossing to seal.

Then I cut out of the leaves the gales for the body tail and wings and stickled around the edges. Left to dry then glued together and added a large gem for the eye!

Summer:
 
I just love the butterfly on this! This is made from silver skeleton leaves which I sprayed with Crafters Companion Pearl Diamonds Spray and Sparkle and then edged with stickles.

The background was plain white cardstock, embossed and the inked with distress inks.

Autumn:
 
I struggled to decide whether the Autumn or Winter ATC is my favourite, but I think that Winter just wins as I simply love the teal colour scheme!

The background for this was made using Sheena Douglas' faux leather technique (kraft card, embossing folder, glycerine, distress inks etc).  I glued the skeleton leaves to the background. The red card strip is edged with a tonic punch. The tags are cut using a tag punch that I don't know the make of!

Winter:
 
My absolute favourite for sure, a probably my favourite season too!! The crisp air is so refreshing to breath in.  It is also the time of year where we focus more than ever on bringing the family all together in one place.

I just love the colours of this and I love working with acrylic paint. I painted a couple of thin layers of home mixed teal blue acrylic paint onto thick cardstock. Whilst still wet I stuck the snowflakes on overlapping the edge with some.

I would like to enter these projects into the following challenges please:

ATC Swap - Oriental

So the July/August ATC Swap over at my favourite Facebook Craft Group had an Oriental theme so I put my new Promarker Ultra-fine nibs to test and coloured in 6 very small versions of the My Besties Geisha digis Stamp!

5 have been sent off destined for this themed swap and the extra ATC is up for grabs at the end of this post if anybody would like to do a swap!

So here are the 5 submitted for the swap over at the CRAFT,CHAT, SHARE & CARE group:

 
I used a Joanna Sheen die for the fans, and the Japanese themed backing papers are from a small kimono block, not sure of the brand!
 
Until next time!....

I would like to enter this project into the following challenges please:

Challenge Winner - Treasured Times Stamps

So, I'm getting into this challenge business and it's quite addictive!

This week (or was it the end of last week?! I can't remember!), I chosen as the winner of July's "Anything Goes" challenge over at Treasured Times Stamps!


I was so thrilled to have been picked for this challenge as my entry was the 52 Reasons mini album that I blogged about earlier this month!


I also received more good news this week from blog land which I shall be announcing shortly! This is a new venture that I am very excited about indeed!!

Anyway, a big thankyou again to Treasured Times Stamps for picking me as your winner, for gifting 3 of your gorgeous digis stamps and for inspiring me to continue entering challenges. Thank you also to Bugaboo Stamps who sponsored the challenge and gifted 7 of your digi Stamps also! What a whopping great prize bundle!!

Tuesday 26 August 2014

Bob!

Hi guys, well today I'll be back to the land of crafting after enjoying a 2 week break with my partner! She had a holiday from work so we spent some much needed quality time together and had a wonderful relaxing time.

I did however manage to squeeze in time to work on a personal crafting project and use up some fleece from another sewing project that I made some time ago. 

Bob the bear is entirely my own design and pattern and whilst I know that he ended up a little longer than intended I love him just the way he is!

 
Before I go, I just want to quickly remind folks about the giveaway that is going on over on my Make It Sew Facebook Page right now!

Click HERE and follow the steps to enter!
 
Please can I enter this project into the following challenges:


Sunday 10 August 2014

Finally I can show you! (52 Reasons Mini Album)

Okay, if you can read this post then that means it's FINALLY my partner and I's 10th anniversary of being together!  This means I've been able to give her the Mini album a made for her, so can show it to you guys!  It has been finished for a few weeks now and I've been impatiently counting down the days!

This post is VERY picture heavy, but I hope you find it well worth the read and as much fun as this project was for me to make!

This is the first mini album I've made, and there are a small number of lessons learnt for the next one, should I be so brave! I'll list these at the end of this post.

The album is constructed from a sandwich of brown corrugated box card and cereal box card.  This has given it wonderful structure and was easy (and free!) to source.  I worked out the dimensions by noting the diameter of the book rings that I used to bind the album together as well as the playing cards that form the pages.

The Papers used to cover the album are 12" square papers from my stash. The wording on the front cover was cut on a Silhouette Cameo (not mine, boo hoo!), out of black cardstock, and stuck on with Anita's PVA glue.

 
I sandwiched two pieces of white organza ribbon in between the paper covering the outside of the album and the lining paper, thus creating a ribbon tie closure.

 
I went ribbon crazy, decorating and disguising the 3" book rings on the outside of the album, using lots of widths and types of ribbons and lace in reds, creams, oranges and blacks, with the odd silver one thrown in! 

I melted each end of all the ribbon pieces using a lighter, to prevent fraying.

 
I created two bead strings, threading different beads on to a very strong embroidery thread and securing though a couple of the ribbons on the top book ring.

 
So, on to the inside of the album. As already mentioned, a deck of playing cards made up the pages, and this is the deck I used, before any alterations were made!  This is one deck out of a two deck set from WH Smiths, that Claire and I bought at an airport on our very first (and only!) holiday abroad together, many years ago!

 
Firstly I distressed the back sides of every card with Distress Ink in "Worn Lipstick".

 
I wrote all my "52 Reasons" on to individual rectangles of copier paper, half in black and half in red.  I distressed the edges of these rectangles with "Gathered Twigs" Distress Ink and stamped the little hearts using the same ink pad.

Then I layered each reason onto the same colour card stock and after choosing my final order, stuck these to the cards, matching the ink colour to the colour of the card's suit.  (and no, I am NOT showing you all my mushy reasons ;-) )

 
The numbers 1 to 52 were then glued to the back of each card.  These numbers were also cut by a Cameo.

 
I fancied up the first "page" and the last 2 "pages" in the album to give a bit more detail, and to disguise the reverse of those pages.  I used acrylic paint in white as a primer and whilst still wet stuck pieces of bakers twice to create a textured surface. 

 
Once dry I applied a few coats of red, coarsely painted over, adding white highlights to the raised areas created by the bakers twine.  I finished the front "page" off with a die cut heart stuck on with Pinflair glue gel holding a string of black sequins in place.  The sequin string is finished off with tiny "made with love" charms".

 
The second to last and front side of the back pages were painted with the red acrylic paint, and then had paper and black card layered onto them.  Onto these I have added photos of Claire and I (which I'm keeping private!).

 
The last page was painted with the red acrylic and finished off with the bakers twine, the match the first page.

 
And finally, the inside covers of the album itself are lined with matching papers, and I added a few more personal touches.  The inside front cover has a pocket with two tags one which I added more photos of Claire and I.  The little hearts are attached with Pinflair glue gel to add a bit of dimension.

 
The inside back cover has a "final thought" from me, hidden under a folding back "Don't forget..." banner.  The hearts are die cut, as is the intricate background to the final thought. I've added some faux stitching details in black fine liner to the inside of both the front and back covers.


And, that is it!  I do hope you have enjoyed this blog post, I'll leave you with one final photo of the inside of the album.

 
LESSONS LEARNT:

1... Be sure to leave enough of a gap between the cover and spine pieces otherwise the paper can split very easily (hence the separate paper section over the spine area, which actually made it look much better, but wasn't intended!).
2... Invest in a Crop-O-Dile!  I had to drill, yes DRILL the holes in the spine of the cover for the book rings to go through.
3... The more ribbons tied to the outside parts of the book rings the better!  These stop the book rings from shifting round, making for a nice sturdy fit.
 
xxSAMxx 
 
I would please like to enter this project into the following challenges:

Friday 8 August 2014

Giveaway time over at Make It Sew!

It's GIVEAWAY TIME over at the Make It Sew Facebook Page!
 
So pop over to www.facebook.com/Krafts4CMT to take part!
 
Up for grabs is the "Olga" Owl Cushion pictured.
 
 
The Giveaway ends 30 August 2014 so don't miss out!

 Good luck!

Friday 1 August 2014

Box Crayzee

Another pop-up card!  I said in my last post that they are addictive!

Anyway, this card was made for my Nephews 7th birthday last weekend and I am assured that he was sufficiently overjoyed at receiving it! (sadly I missed out on seeing him on his birthday for the first time since he was born, if I remember correctly!).
 
For once, I kind of remember where the papers are from.  The come from Cricut paper pad called "Tags, bags, boxes and more".  I do not have a Cricut machine, but just loved this paper pad so had to grab it!

The stars are hand drawn/cut and the letters are Sizzix Bigz dies.  The cardstock is from American Crafts.


The image is a free one, available to members of the Jelly Park Post Pals Club.  The creator of the Jelly Park stamps kindly gives away a series of stamps to those who use them to send cards/projects to poorly kids as part of the Post Pals scheme.  This is certainly worth a look and very rewarding. 

 
I coloured this image using the following Promarkers:

HAT: Burgundy, Poppy, Red, Cool Aqua.
SKIN: Ivory, Dusky Pink, Coral, Blush.
HAIR: Cocoa.
JUMPER: Ginger, Mandarin.
TROUSERS: China Blue, Prussian.
SHOES: Cool Grey 3 to 5.
SOCK MONKEY: Ivory, Grass, Yellow, Tulip Yellow.
 
The blue details on the hat and the yellow stripes on the sock monkey are blinged up with stickles.
 
I would please like to enter this card in the following challenges:

Pigs might fly

I can't be the other crafter out there completely obsessed by the Pop-Up Box?!

This was made this week for an order, the brief being "pigs"!
 
 
The digi-stamp I used for this is "floating pig" by Hambo Stamps.
The balloon(s) came as part of the image, but I separated this out and printed several in different sizes to separately "attach" the piggy using bakers twine. 
 
I mounted the balloons and hand cut clouds on acetate strips. 
 
 
The balloons and pig are coloured using the following Promarkers:
 
PIG: Dusky Pink, Pale Pink.
BALLOONS: Blender, Cerise, Cyan, Grass, Bright Green, Tulip Yellow, Buttercup.
 
The sentiment and name is stamped in "Seedless Preserves" Tim Holtz Distress Ink.  The papers are from my stash (as always I haven't a clue where they came from!) and the pink cardstock is by American Crafts.
 
Please can I enter this card in the following challenges:


Extreme hoarding... cat edition!

Sorry for my absence folks, no excuse!

Well, today I finished the last "Kitty" Cat cushion for a large order!  12 in total, all bought by my friend Denise, to be donated to the The Scratching Post Cat Rescue where they will be sold to raise much needed funds.

So, without further ado, here are 11 of them! (number 12 is a secret as it is made using the same fabric as I've used for a present that is tucked into the box for Denise! (I'll let you see this, and the 12th cat cushion, once my friend has received them!).


Fingers crossed they all find new homes and make lots of money for the rescue!

p.s. - these can be made to order if wanted! Just drop me a comment below, or pop over to my Facebook page HERE.

I would please like to enter this project into the following challenges: