
So I've had an idea in my head for some time but this week I finally brought it to fruition!
The whole bag used under 1 pair of jeans; I was left with one whole leg which I'm sure I will find a use for! The jeans I used for this were a ladies size 16 although size doesn't really matter other than to make the finished bag size bigger or smaller.
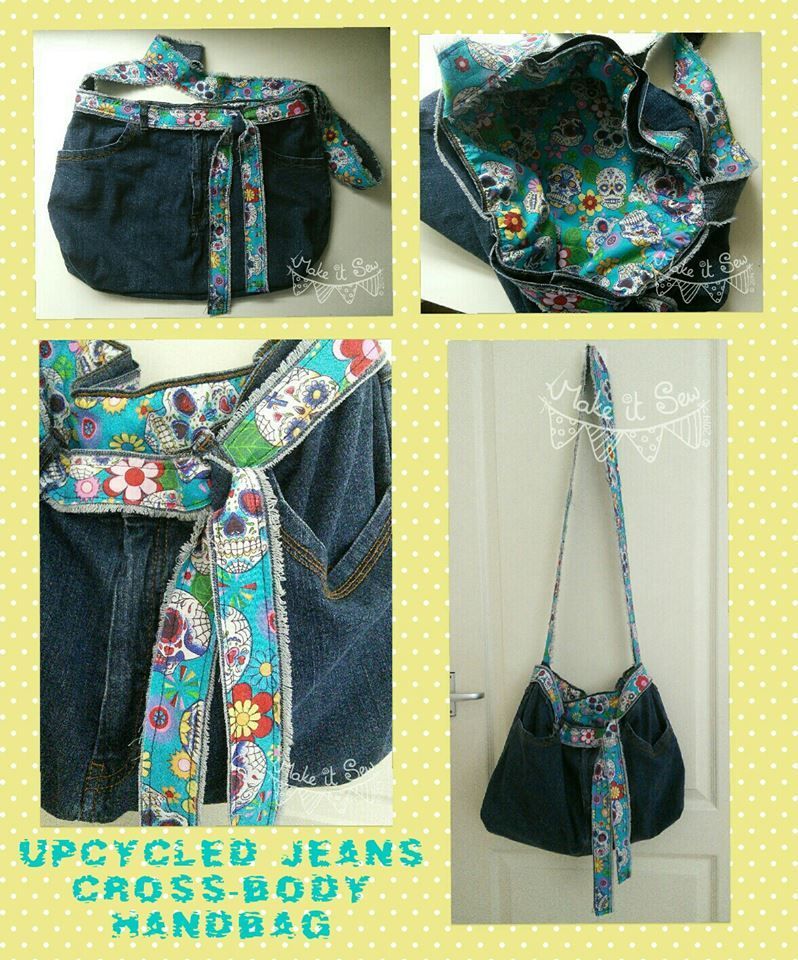
Other than the pair of jeans I used around a 1\2 metre of cotton fabric in this stunning retro skull pattern.
The bag was straight forward to make. I cut off the legs at the relevant place leaving enough in the main section to give me the depth of bag that I wanted. Don't throw those legs away though! We use them a bit later. The crotch was cut open and the front/back and bottom sewn up. I then put boxed corners into the bottom of the bag.
Next strips for the cross-body strap were cut from one of the legs. I cut three 1 3/4" wide strips for the strap and whilst there also cut three 1 1\2" strips for the decorative belt. Approximately 1" at the end of the strips were overlapped and topstitched together with a zigzag stitch.
Slightly narrower strips were cut from the skull fabric and topstitched onto the denim strips that were cut at the last stage. This left me with 2 long strips, one wider one for the strap and a narrower one for the decorative belt. I finished these steps off by fraying the long edges to add to the hippy look of the bag.
I sewed the straps into the bag, pinning and trying on first in order to get the strap the length I wanted. I strengthened these stitches by double sewing as well as sewing in a cross to reinforce.
Finally was the lining which I cut to fit the bag before sewing the sides up and boxing the corners to match the outside bag. The lining was then painstakingly hand stitched into the bag ensuring to stretch the stretchy and elastic denim out to fit the lining.
So this was surprisingly easy to make, with the hardest (for "hardest" read instead "most tedious / most likely to turn my finger end into a painful mess") job being the many many teeny tiny overhand stitches to sew the lining into the bag. I did not want to machine stitch the lining in and spoil the outside appearance of the bag; so finger stabbing stitches through the thick denim was my alternative!
Well, I'm very glad that I endured the monotony because the hand stitched finish is so much cleaner and attractive looking!


So that finishes this blog post! I think I am going to add a small piece of Velcro into the from pockets just to keep them from gaping open whilst in use and may also add an applique of one of the skulls from the fabric to the front although I've not completely made up my mind on that point.
Anyway, thankyou so much for stopping my and reading my blog. Every view means a lot to me, and every comment means even more.
Sam x
That is brilliant tutorial Sam and one I wil try I just need some time to get to it lol.
ReplyDeleteI like the linning material you have use.
Janet xxx
Thanks for a great tutorial, Sam! The bag looks great! xxx
ReplyDeleteHi Sam fabulous bag and thanks for the info - appreciated x
ReplyDelete